In this first tutorial, we look at how to trigger and gate Sounds from a MIDI keyboard.
Here is the accompanying Kyma Tutorial Sound file. I suggest you save a pristine copy of that and then use another copy for each tutorial user.
[Each of the headings below corresponds to a Sound with that same name in tutorial Sound file. You can leave this window open to read along as you look at the Sounds and do the tasks in Kyma.]
#1A: TRIGGERING AND GATING FROM A MIDI KEYBOARD
To use this specific tutorial you will need to have a basic understanding of MIDI keyboards and how to set them up to control music equipment. You will, in other words, need a setup with a functioning MIDI keyboard and MIDI interface. The default MIDI channel should be 1.
This might be a good time to mention Configure MIDI from the DSP menu where you can set the default MIDI input channel and monitor incoming MIDI values. Note that you can also see when you are receiving MIDI input by looking at the DSP Status window. A small ‘m’ appears whenever MIDI input is received by the Paca(rana).
TASK #1: Play this Sound by clicking on (activating) the rightmost icon and pressing the space bar (a standard method of playing all Sounds in Kyma). You will hear a continuous sax sound looped. There will be a slight pause between repeats of the loop. These first tutorials will demonstrate various ways of turning the sound on and off independently without using this rather crude on/off method. But first we need to define two basic terms associated with this on/off activity: triggers and gates. To stop the Sound, press the space bar again (or use Ctrl+K).
Triggers and gates are what turn the audio streams from Kyma Sounds on and off. As an analogy, think of a sprinkler system where you have short pulses that initiate spurts of water. These are triggers. Now think of a faucet you turn to let a continuous stream of water through. This is a gate, which you open and shut. Now substitute sound for water, and you have the analogy of triggers and gates. Unless you want a continuous sound lasting forever, you will need these two concepts to start, stop, and continue sounds.
Being momentary, triggers initiate things. Usually they need a second partner in order to work; typically an envelope generator such as the AR or ADSR (the gate). And so, the trigger, which may be from a MIDI keyboard or PulseTrain oscillator, or any number of other devices, starts the ball rolling and the ADSR follows through with the gating, shaping exactly how the sound will continue — will it end in 3 seconds, will it sustain for 1 second and then drop down gradually, etc. As it happens, the sax sample is embedded in the Sample Sound, which is a kind of shell containing various ways of controlling the sample. We are only concerned here with the trigger/gate aspects.
TASK # 2: Play and stop the Sound again. Pretty basic, huh? Since it is continuous, we need to have a trigger/gate combination to act as the faucet. Here we will use a MIDI keyboard, the most basic of all controllers. Look at the Gate parameter field and hover your mouse over the title to see what it entails (get into the habit of doing this for every new parameter field entry. The help and info areas are central to your understanding of Kyma). The Gate field is what triggers and/or extends the Sound. Note that it has a value of “1”. In Kyma, the number 1 often means “on” and 0 means “off.” So it is here.
In order to get rid of the “1” we need to substitute a proper faucet to turn the Sound on and off. Enter the MIDI keyboard. Substitute the hot value !KeyDown for the 1 by typing it in the Gate parameter field. Play the Sound (space bar pressed). Nothing happens now until you press a MIDI key. What is happening? The keyboard is sending a “1” to the Gate parameter field [along with a momentary -1 value to signal any currently sounding audio on this voice to decay to zero], and as long as you hold the key down, the “1” is present. When you release the key the keyboard sends a “0”, thus turning the Gate off. This is further embellished by the AttackTime and ReleaseTime parameter fields. So, put the Sound in play once again and experiment with the !Attack and !Release hot values in the VCS (Virtual Control Surface) to see how the !KeyDown relates to these.
After this exploration, return the Gate parameter field to a value of “1” in preparation for the next task.
TASK #3: GATE THE SAX WITH ADSR: For a more elegant gating method we’ll use an ADSR. From the prototypes (Ctrl+B), find the ADSR Drag&Drop Sound and insert it between the Sample and Annotation (but NOT on the circled plus sign).

Here you will find two Sounds; the “x * y” Sound just takes its two inputs and multiplies them much like the voltage controlled amplifier in electronic music. The ADSR is your traditional envelope generator. Double click to open it and mouse over its headings to see its characteristics. Note that its Gate field contains !KeyDown. This is a standard gating for the MIDI Keyboard, so play your keyboard to gate the Sound (always click the rightmost icon before pressing space bar to play) and tweak the various envelope widgets in the VCS.
PROBLEM: The sax sound looping is independent of the !KeyDown that controls the ADSR’s volume envelope. How could you fix this so that the Sample always begins at its start point when you press the key? (Hint — do it in the Sample Sound) Try to solve this yourself before going on to the…
SOLUTION: Go to the Sample Sound and enter !KeyDown in the Gate parameter field. This will trigger the sample to always begin at its 0 start point when a MIDI key is pressed. Note that you are not gating the volume of the sample here. You are only telling the sample to always start at its 0 point. As long as you keep the key pressed, it will be sending the “1” to the ADSR at full volume, serving as its gate, keeping the faucet open. When you release the key, the ADSR !Release takes over, and may further extend the sound to a gradual diminishing volume slope.
1A (ANSWERS): TRIGGERING AND GATING SAMPLES FROM MIDI KEYBOARD
Note that there are three very special hot values in this Sound. Why special?
- although they are present in the Sound itself, they do not show up in the VCS;
- they will be critical in future usages in Sounds such as the StepSequencer.
- Unlike most hot values or expressions in Kyma, these three have very specific keyboard-related functions and should only be used for these functions (unless you are deliberately using them for cross-functional implementations).
TASK: Look for these three hot values and describe their function.
ANSWERS: !KeyDown, !KeyNumber and !KeyVelocity. These relate primarily to MIDI keyboards and the StepSequencer. Hover your mouse over the parameter fields containing them to more fully understand how they function.
#1B: AUTO TRIGGERING/GATING USING !BPM
At this point it might be helpful to introduce the hidden annotation feature. When in the VCS, look for the tiny red boxed question mark and click on it. This gives you an independent window with all this text so you can simultaneously see the Sound module you are working on AND the tutorial Annotation text.
The Sample Sound, which you see here with a trombone sample, has all the ingredients of a vessel to contain and then release the sound when activated by a trigger. It doesn’t need the ADSR for more basic gating functions.
TASK #1. Make the Sample active by clicking on it. Hover your mouse over each parameter field heading in the Sample to see how everything works. Since it already has an attack time and a release time (this is called the sound “envelope”), all it needs is a trigger to initiate everything, and the attack and release will take it from there (many other such Sounds just output steady volume and do not have built-in envelope features). For the Sound named Trombone sample, you will use a !BPM value to trigger.
TASK #2: Go to the Expressions Library in the Sound Browser (Expressions Library/triggers & logic.txt/Trigger at !BPM rate) and find the expression Trigger at !BPM rate.
!BPM (beats per minute) is a ubiquitous device in Kyma for all sorts of things. It sends a trigger pulse at the beats-per-minute (BPM) rate. And you can control that rate by moving the !BPM fader (which is called a “hot value” by virtue of its being preceeded by the exclamation point) up or down in the Virtual Control Surface. Click on Trigger at !BPM rate in the Expressions Library again to see the text below describing it. Go to the Trombone Sample, double click to open it, go to its Gate parameter field, delete what’s in the Gate field. Now return to the Expressions Library and click/drag the same expression Trigger at !BPM rate into the Sample Gate parameter field. Be sure to click/drag it from the basic heading, not the interior text (click the image below to see a larger version).
![]()
[Remember to drag it into the light green area, not the dark green area.]
CAPYTALK: Here you are seeing the Kyma language that makes for such flexibility in customizing your Sounds.
Let’s explore this Capytalk expression (1 bpm: !BPM) briefly. Since this is a Gate field, it has to do with letting Sounds through, as I described in Tutorial #1A. The “1” in the expression says “I’m turning on whatever comes after this number.” So now that it is turned on, it’s waiting for whatever else may come along, and here we have what’s called a Capytalk message, which is always in purple. The message bpm: says “beats per minute”. The colon after it (not all Capytalk messages have colons; some are just to qualify an expression) means that it is waiting for further instructions as to “exactly how many beats per minute do you want?” And the answer comes in the last part, !BPM.
Whenever a Capytalk word begins with an exclamation point, it means that it is a “hot value” which, with some exceptions, will appear as a widget or fader in the Virtual Control Surface (VCS) when you play the Sound. Since it does appear as a widget that you can manipulate, this is what gives you control over (in this case) the tempo.
So, select the Sound by clicking once on its rightmost icon, and press the space key to play it.
By the way, don’t confuse the continuous looping of the Trombone Sample with the gating you have just done. The looping has its own tempo apart from your gating.
The VCS will come up with a few widgets controlling things like amplitude envelope (attack, release), pitch (Interval), scale (output volume), and BPM (beats per minute). At this point, go back to the Kyma 7 User Guide starting on page 75 to review the VCS and how it works. Before leaving this, play with the widgets and hear what effect they have. Finally, go back to the Sound window itself with its parameter fields and connect each hot value or expression (in red) with a widget.
To summarize, the !BPM acts as the trigger, governing what tempo the trigger will be at according to the !BPM rate you set in the VCS; the attack and release act as the gate, sculpting the sound envelope.
The Capytalk expression (1 bpm: !BPM) expression is a “metronome” that generates a gate periodically at a specified rate. The general form of the expression is:
<aGate> bpm: <aRate>
The first value, <aGate> is like the switch that turns the metronome on or off. In our example, the switch is on (because it is 1). You could turn it off by typing a 0 instead (but that would not be very interesting). Where this becomes interesting is when you use a hot value such as !Gate for the on/off switch. Now you can start the metronome by pressing the Gate toggle in the VCS. And turn it off by pressing Gate a second time.
1C: AUTO TRIGGERING/GATING USING A LOW FREQUENCY OSCILLATOR
Here we use a low frequency oscillator as a trigger in a Sample Gate parameter field.
TASK #1: Find a square wave oscillator in the Prototypes (the one that works best is called RhythmicTriggers, which is actually a PulseTrain oscillator), copy & paste it in the Sample’s Gate field and click “accept” which will allow the pulse trigger icon to pop up. (You may have to click on the 3 dots to the left of the Sample to see the PulseTrain Sound). Now select the Flute Sample and press the space bar to play, then stop play. In the RhythmicTriggers parameter field called Period, type in the following expression: !RTFreq hz inverse. This will give it a frequency of from 0 to 1 cycles per second with no alteration in the VCS.

TASK #2: While we are at it, let’s also differentiate the pitch by going into the Sample’s Frequency parameter field and designating it !IntervalFlute nn. Select the Flute Sample icon and play the Sound. When the VCS opens, you will need to adjust !IntervalFlute fader to go from 36 to 96, which correspond to the MIDI note numbers. To do this, in the VCS, you need to Ctrl+click on the IntervalFlute widget and choose Change Range from the menu. For further help in working with the VCS, refer to Kyma X Revealed, page 404, or the Kyma 7 User Guide, starting on page 75.
TASK # 3: This particular pulse oscillator is specially designed for gating. Before proceeding, select the Rhythmic Triggers Sound. Select its DutyCycle parameter field and, after making sure it is empty, type one exclamation point in the field. This will cause the whole !DutyCycle hot value to appear.
![]()
Play the Sound again (always from the rightmost icon). In the VCS, reduce the attack time and release time to 0 to give the !DutyCycle a clear field to work. As you play the Sound, play with the DutyCycle fader and note how it works as a variable gate. Save this as the Default preset by Ctrl+clicking the camera icon in the VCS at its upper left.
![]()
Remember that triggers and gates are similar. A trigger starts an action; a gate sustains the action until the gate’s value goes to zero.
1D: GATE THE GATE
As it is now, the trombone and flute samples run continuously when played, as they are automatically triggered. Here we are going to learn how to turn each triggered set off and on independently; to “gate the gate,” so to speak.
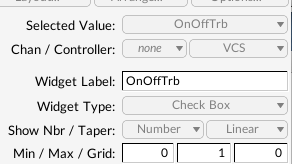
TASK #1: First, go to the Trombone Sample Gate field and replace the “1”, which means “on forever,” with a switch box that can be turned on and off with the mouse. So, replace the “1” with the following: !OnOffTrb followed by the remaining bpm: !BPM making the complete expression as: !OnOffTrb bpm: !BPM.
![]()
Play the Sound and hear the sound continuing as before. That is because the widget now called OnOffTrb is positive. Move that fader to 0 and the sound ceases. To change this to a check box, Ctrl+click the fader and select Check Box from the Widget Type submenu.
Now, use the check box to turn it on and off. The !BPM is still pulsing the sound, but now the total effect can be turned on and off.
1E: GATE THE GATE (FLUTE) WITH CHECK BOX
TASK #1: Do a similar process with the Flute Sample as you did with the trombone sample, this time performing the operation in the Gate parameter field of the Rhythmic Triggers, where there is also a “1” lurking. Replace this with another hot value, this one distinguished from the last by the Fl suffix, making it !OnOffFl. Now perform the same operation as before in the VCS, and play this Sound to try out its check box.
This finishes Tutorial A, Part 1. Next, go on to Part 2…
Please send feedback to me at: bpmclean55@gmail.com