This is a continuation of Tutorial C, Part 1. Part 2 focuses on the SampleAndHold in several manifestations.
In the text below, I am assuming you have completed Tutorial A and Tutorial B as well as Tutorial C, Part 1.
We continue using the same Kyma Tutorial Sound file we used in Tutorial C, Part 1.
Each section refers to a correspondingly-named Sound in this tutorial’s Sound file.
FUN WITH SAMPLE AND HOLD
Yes, I know. Everyone has gotten tired of the sample and hold sound of the 70’s. But Kyma puts some new twists on this old dog that are worth exploring, producing patterns that are outside the realm of the StepSequencer.
#5: YOUR BASIC SAMPLE AND HOLD WITH WHITE NOISE
We will depart a little here and begin with a Sound already fully formed. This is a basic SampleAndHold (S & H) controlling an Oscillator, with a SoundToGlobalController in the middle as a display tool to show you the values that the S & H is putting out. Here are the components of the SampleAndHold Sound from left to right:
- The Sound output is sampled, in this case, Noise (White) which gives a wide range of random numbers in the range of (-1,1).
- The SampleAndHold which samples the above, freezes the output for its !HoldTime and sends it on to…
- The Frequency parameter field of the Sound being controlled, in this case the Oscillator.
A further Sound present is the SoundToGlobalController, which is simply a passive display vehicle and does not enter into the process except to display its numerical result in the VCS as the !SH widget.
So, no ADSR, no !BPM. The SampleAndHold itself takes care of the rate with its !HoldTime. Of course, this means that there is no envelope shaping, but we’ll take care of that in future tutorials.
The more interesting expression, the one that is key, is found in the Frequency parameter field of the Oscillator. It begins with the yellow Sound, which is simply the output of the SampleAndHold. Play the Sound (always from the rightmost icon). Note that the !SH widget displays values from -0.5 to + 0.5. Not your acceptable frequency numbers. The !FreqRange, then, multiplies this number by whatever its value is. So, for example, if you get a momentary sample value of -0.3 from the S & H, and the !FreqRange is at 50, you will get a value of 15. This result (all encased in the inside set of parentheses) is then added to the !Interval. If the !Interval value is 20, then you would have a note number of 50 (we know it is a note number and not a frequency because of the last “nn” in the expression), which would be D below middle C. The outside set of parentheses encapsulate the whole expression, meaning that everything is subject to the “nn” message.
Play around with various settings to see what they do, and, as always, read up on the various Sounds by hovering over their headings and parameter fields.
This has no “Answers,” so go on to #6.
#6: TRIGGERED S & H WITH KEYBOARD TRIGGER SAMPLING WHITE NOISE.
Several different approaches here:
- Using a different SampleAndHold Sound, the TriggeredSampleAndHold.
- Triggering from a MIDI keyboard.
- Traditional envelope shaping with an ADSR.
TASK #1: In the Prototypes, find the TriggeredSampleAndHold. Open it and read about what it does by hovering over its parameter fields. You will see that it is triggered by the traditional 1 bpm: !BPM expression. Play the Sound and turn the output level (!AmpLow) up so you can hear the clicks. These are the sonic equivalents of the numerical values it is putting out.
TASK #2: Integrating this within the existing tutorial. Substitute the TriggeredSampleAndHold for the existing one by dropping it directly onto the old one in the signal flow editor. Play the result (always from the rightmost icon). The only change is with the trigger, which is now flexible as a hot value in the VCS. Everything else is the same.
TASK #3: Triggering the S & H Sound from a MIDI keyboard. Find a way to use a MIDI keyboard to trigger this S & H, and add an ADSR to shape the oscillator envelope. Hint: You need to trigger it in two places.
Go on to #6 Answers to find the solution.
#6 ANSWERS. The ADSR was placed in the Envelope parameter field of the Oscillator, with !KeyDown as the trigger/gate in the Gate parameter field. Similarly, in the TriggeredSoundToGlobalController, we put !KeyDown in place of 1 bpm: !BPM. To play this Sound, just play a note on the MIDI keyboard and it will trigger the next value. There is no pitch control from the keyboard — just a trigger.
[If you don’t have a keyboard, you can use the fake keyboard found under the Tools menu in Kyma.]
[ Instead of !Interval in the Oscillator Frequency parameter field, you can substitute !KeyNumber,which would put the keyboard also in control over the overall pitch transposition.]
#7: TRIGGERED S & H SAMPLING LFO, W KEYBOARD TRIGGER
TASK # 1: A simple one this time. Open the tutorial. Just substitute an LFO for White Noise as the Sound to be sampled (Go to the prototypes and copy/paste the LFO as you have done before. Select White Noise and paste the LFO right on top of it. Now play the Sound, go to the VCS and, as you trigger it from the keyboard, change the !BPM widget and see what a difference in pattern it makes as you do. But there is a problem here, since you still need to use the keyboard as a trigger. That will be next.
For now, go on to the #7 Answers and compare.
#8. TRIGGERED S & H SAMPLING LFO (W FORMANT CHANGE) W INDEPENDENT BPM & TEMPERED SCALE
Building on #7 (Answers) we will take this three steps further, concentrating mainly on the LFO. Previously you will note that the LFO frequency was tied to !BPM relegating the actual triggering to a manual keyboard (look at its Frequency parameter field). Here we will use this !BPM as the triggering mechanism, which means that we need to find some other way (other than !BPM) to govern the frequency of the LFO being sampled. In other words, we need to make the LFO completely independent from the sampling trigger, which then needs to reform as an independent trigger both at the TriggeredSampleAndHold Sound and the ADSR. Before we proceed to the tasks at hand, see how much of this you can figure out on your own. Try different ways of achieving this independence and yet still being able to provide coordinated triggers for the S & H and the ADSR. We will provide one pathway to this below.
TASK #1: Independent frequency control for the LFO. In the LFO Frequency parameter field, change the “!BPM * 0.001 hz” expression to a simple expression, say, “!LFOFreq hz”. Now you have made the LFO completely independent from anything else and free to act more flexibly as the agent to be sampled. To add further variety, go to the Formant parameter field of this LFO and read about what it does. This changing of the waveform being sampled (not frequency or volume, but WAVESHAPE) can have significant effect on the resulting pattern. Just type the exclamation point and you will get !Formant. Add to this “LFO” to distinguish it, in the VCS, from the formant in the audio oscillator.
TASK #2: Trigger to replace !KeyDown. Now that you have freed up the !BPM from its role in governing the LFO frequency, use it instead to act as the trigger for the S & H. This means triggering in two separate places. Just go through the whole Sound and wherever you have !KeyDown as the previous trigger, substitute the ubiquitous “1 bpm: !BPM”. This will act as the automatic trigger.
TASK #3: Adjusting the VCS for the new additions. For the “!LFOFreq” I would suggest a range of 0 – 50 hz. That will give you plenty of room for some crazy patterns. The !FormantLFO could have a range of 0 – 5. All else would remain the same. Now play the Sound from the rightmost icon and enjoy the ride, as so many of the VCS controls interact in strange ways.
TASK #4: The final tweak is to make all of these pitches conform to the equal-tempered chromatic scale. Do this in the Oscillator Frequency parameter field by adding the Capytalk message “rounded” between the last parenthesis and the “nn”. This message converts all fractional results to whole numbers, and with the “nn”, all whole numbers will correspond to an equal-tempered note number. Finally, play with this and save some interesting patterns.
#9: S & H CONTROLLING FILTER FREQUENCY
The Sample & Hold concept is not just relegated to producing note patterns. This is a simple way to have it control the cutoff frequency of a lowpass filter, using the basic S & H material from Tutorial 8.
TASK #1: Play this tutorial, which features a looped trumpet sample. Using the TriggeredSampleAndHold from Tutorial 9, devise a way that this can be used, not to control the Sample pitch, but rather the cutoff frequency in the LowpassFilter, resulting in a regular timbral pattern. Try it first on your own and DON’T PEEK. Before doing so, hover over the filter heading to see what each parameter field does.
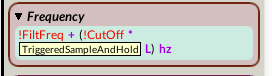
TASK #2: Open Tutorial #8 (Answers) and place it beside this tutorial. Take a look at Tutorial 9 Filter Frequency parameter field. It just has one hot value, the !Cutoff. Play Tutorial 9 and move the !Cutoff widget to hear how it affects the Filter frequency. We are going to make the various changing values of the S & H to move this frequency, with a bias control (!FiltFreq) and using !Cutoff as a steady control that can be multiplied by the S & H data to achieve different values.
TASK #3: From Tutorial 8 (Answers) click once to activate the TriggeredSampleAndHold Sound (don’t open it) and copy, paste it into the Filter Frequency parameter field. Paste it just after the !Cutoff. The full expression, then, would look like this:
When finished, click “Accept” to integrate the new Sounds with the existing Sounds. Play the Sound and experiment with various !Resonance and !Cutoff settings.
Go on to the #9 Answers Sound for confirmation.
#10. SAMPLING MULTISEGMENT ENVELOPE & LOTSA BELLS & WHISTLES
Nothing like ending our S & H discussion with a grand finale tutorial. I’m not going to try to nudge you into creating all of this from scratch because it would take more room than I have available, but I did want to try to show you something with a little more advanced potential for the venerable Sample and Hold technique.
Take a look at the Sound’s main window. I have the icons grouped into four areas according to function.
The top MultiSegmentEnvelope, independently pulsed by the “1 bpm: !BPM”, furnishes the material to be sampled, both in terms of the main unit to the bottom right, and the optional triggering unit to the left which itself provides additional randomness when activated by the !TrigGate.
The leftmost area contains two TriggeredSampleAndHolds with their own Oscillator triggers which are only activated if the !TrigGate is positive. Their function, when activated, is to provide additional randomness and uncertainty to the main pulsing.
The bottom right contains the main unit. It by itself, along with the MultisegmentEnvelope could constitute a complete S & H Sound without the other bells and whistles. The Oscillator Trig triggers the ADSR as well as the TriggerededSampleAndHold Final, and controls the frequency of the two audio oscillators, Oscillator 1 and Oscillator 2.
The upper right constitutes two PulseTrains which, when activated by the !PTGate, together add an optional pulsing to the audio.
TASK #1: Now play the Sound and see in the VCS the various components of the Sound highlighted as to function by their color. The MultisegmentEnvelope widgets are the only ones subject to the dice roll (unless you wish to enable others). Roll the dice during playback. I suggest that, when you roll the dice for these, that you further restrict, in turn, the “Dur” and the “Val” widgets so you can better hear what the various segments do (you enable a widget for dice rolling by clicking on its widget name, and disable it by clicking again. By default, I have disabled all widgets except the blue ones). Before proceeding, open up the MultisegmentEnvelope Sound and learn what it does (by hovering the mouse over the parameter fields), how it can be varied, how it’s triggered (independently here, so changing the !BPM has no effect on the pulsing, but rather on the nature of the note patterns). Each preset illustrates a particular aspect of this somewhat complex and variable Sound.
To recap the three Gate functions:
- OnOff (green): Turns everything on and off (after the Sound has been play enables).
- TrigGate (red): Optional. Enables the two extra TriggeredSampleAndHold units for further random pulsing variety.
- PTGate (yellow) (PulseTrain Gate: Optional): Turns on and off the pulsing of the audio signal.
Brief description of the functions when the VCS is opened:
Blue box: Contains MultiSegmentEnvelope widgets. This is the entity that always provides the sampling material, whether it’s for the final sampling to the bottom right, or the two additional random units to the left, or all. It is independently controlled via the !BPM.
[Actually the MultisegmentEnvelope generator, or any envelope generator for that matter, when pulsed at an audio rate, can assume the characteristics of, and is no different from, an audio waveform.]
Red box: Governs the tempo and the ADSR characteristics. When TrigGate is disabled, it acts as a traditional S & H trigger unit, except for the Max and Min controls. When these are at the same value, there will be no change. But when Min is lower than Max, a random tempo element is added, and the more extreme the disparity between Min and Max, the more extreme the tempo randomness.
When TrigGate is enabled, a further randomness caused by the interaction of the two S & H units to the left affecting the tempo. To see how this works with the true/false logic in the expression, look at the expression in the Frequency parameter field of the main triggering oscillator, called “Oscillator Trig”. The overall tempo is governed by the TrgFreq widget. You will notice that when the TrigGate is enabled you will need to boost the TrgFreq a bit to compensate.
Purple box: This controls the timbral qualities of this FM (frequency modulation) – derived pair of Oscillators.
Yellow box: (Optional). When the PTGate is enabled, this introduces an additional low frequency pulse control of the audio frequencies, providing additional glitter and interest to the Sound.
TASK # 2: Play the Sound and try out all of its presets, giving you a general orientation. Experiment with the presets and make a few of your own. One of the most powerful tweaks would be to change the !BPM of the MultisegmentEnvelope. This does not change the over tempo but does drastically affect the S & H pattern.
Thus ends the Other Pattern Generation tutorial. But not the numerous ways that Kyma can form patterns. The user is encouraged to go beyond the scope of this tutorial and explore such advanced examples as:
- chaotic counterpoint
- Noodler
- TimeIndex Sound through Waveshaper as index into sequences of pitches w/metric & melodic modulation (Polyphony-4)
…all of which can be accessed through a Sound Browser search (by searching for Sound name).