Introduction: I have developed this Kyma Sound over a yearlong time period to work specifically with melodic material as a sculptor might work with a raw slab of stone, the raw material here being a single instrument or voice line (or any other sound that unfolds as a single melodic line such as bird sound or door squeaks). Once sampled and converted into a spectrum sample, this is placed in a SumofSines shell to be manipulated and molded in such ways that the original is no longer evident, instead migrating into a sea of infinite possibilities of creation bounded only by the composer’s imagination and patience as each stage of the 16-stage StepSequencer affords a unique sound-sculpting opportunity. The basic procedure is to isolate each sequencer stage and develop it using the many parameters available here (sample start, forward or reverse sample and sequence, pitch transposition independent of sample speed, stretching sample stage time or sequence stage time, along with many random features attached to each area). Upon finishing this tutorial, you will have experienced perhaps many ideas and concepts that may be unfamiliar. In fact, developing this over the course of a year, and building on ten years of working with Kyma, has fundamentally altered my own idea of what music is and how to create it. Isn’t this what Kyma is all about?
Barton McLean, Petersburgh, NY, January, 2021.
Download the zip archive containing the files you will need: Bart’s Melodic Sculptor.zip
Experience Bart’s latest work on Youtube which extensively features the Melodic Sculptor. It’s called “Pterodactyl” and the liner notes begin: “The pristine forest has a magic about it… as one walks deeper into the abyss, a presence of creatures long since extinct is felt, their ghosts crying out while haunting the primeval shadows…”
Organization: The tutorial is divided into two sections, each governed by a set of presets explained in this text. The first section (presets being numbered) contains the spectral analysis of a speech sample; a simple count from 1 -10. This helps the user understand exactly what the Melodic Sculptor is doing. The second section (presets designated by letters, not numbers) uses a spectral analysis of a saxophone sample…a snippet from a Charlie Toquarz jazzy solo that might be inconsequential on its own, but which assumes powerful possibilities when used with the Melodic Sculptor. The user is encouraged to explore the limitless possibilities of each preset beyond what is indicated here, but to save any new presets with different names so that the original tutorial can be preserved.
Color coding indicates the various areas in the Sound, and this text’s colors (except white) matches the colors used in the actual Sound’s VCS. See color coding guide at the bottom of this tutorial. Text in red denotes areas where default settings are advised when beginning to set up a preset.
Experience needed: I would characterize this as being intermediate in Kyma skills (conversant with the first two parts of Kyma Revealed up to page 211) along with all of my other tutorials in Insights Magazine. And basically, this is intended for musicians and composers, in order to give them a creative tool, along with guidance, that will hopefully inspire them to more fully realize the amazing potential of Kyma.
I would welcome comments and hearing snippets of your progress with the Melodic Sculptor. Email me at bartprismclean@gmail.com.
Overview
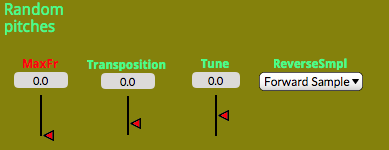
Pitches. each of the 16 stages controls the individual pitch of a single sequence stage. These are in MIDI Note Number form (nn) where 60 equals middle c and is the pitch of the original sample (but see below). To begin developing a preset, best to set all values to 60 as they are here.

Random pitches: Looking at the graphic below, the left two widgets control randomness of pitches, in 1/2 step increments. To begin a new preset, I have set all VCS random controls in red to zero including those from all other red areas. Similarly, the single stages of the pitch controls are all set to 60 as shown above. Zeroing out these values allows you to hear what is going on with the basic controls without random interference (which will be added later). To the right is the overall Transposition (also in 1/2 step increments) of pitches covering all 16 sequence stages of this traditional Kyma StepSequencer. Range is -24 nn (2 octaves below) to 60 nn (5 octaves above). As in all the widgets, you can change the ranges as you wish according to standard Kyma procedures. To begin, the value is set to 0 as per above. To its right is a tuner, which goes from -1 (1/2 step below) to 1 (1/2 step higher) in continuous fashion. The far right menu widget designates forward or reverse motion of the sample for all 16 stages. Unlike the individual pitch controls above within the box, these global controls govern all 16 stages, adding or subtracting to whatever the single stage pitch controls are showing. In fact, all widgets outside the black box are global in nature. All those within the box are individual stage controls for each of the 16 StepSequencer stages 0 to 15.
The following presets should be played and modified as you wish. Do not save your modifications unless you save under another preset name (such as “0-a” or “3-c” for presets 0 and 3, for example). Leave original presets intact since you will want to revisit them. Reminder: In all cases, to play the Sound, the rightmost icon in the Sound should be active and the space bar tapped . Additionally, the GateSeq control should be checked if it isn’t already. This allows the sequencer to loop continually long as it is checked. Here we go…
PART 1: THE COUNT SAMPLE (with Morph widget at a value of 1 in the SumofSines Sound). The Morph control here never does any morphing. Rather it is just to switch between the two SumofSines Spectrum samples.
Preset O: Original Count sample. This is the original sample for the speech series of presets, merely counting from 1 to 10. Note that the original sample duration is 6.93 seconds, as is noted also in the Master Sample Stretch control (pink -mid bottom). This is multiplied by the Single Stage Sample Duration Control (which in this case is just 1, meaning the duration of the whole sample, if played out intact, is identical to that of the original sample). Also note that the relationship between these and the Sequencer Stage Durations is critical. More later on these.
Preset1: Pitches Demo. To isolate everything but the pitch area, I have (among other things) set the sequencer Start/End Index (middle-white) to play only the first two stages of the sequence. So, play the Sound with Preset 1 and move either of the two corresponding stages in the pitch area (P0 or P1) and note how the pitch changes between stages. Now, while playing again, under the Random Pitches area, move the MaxFr (maximum frequency range) to introduce randomness. With each sequence stage another random pitch occurs according to how you specify the widgets. Next, with MaxFr again at O, experiment with the Transposition and Tune widgets. Finally, with the ReverseSmpl widget, select “Reverse Sample” from the menu. The sample will then begin at the end rather than the beginning of the area designated by the Sample Start controls (white, using sequencer velocity control, within the stage box, as seen in the graphic below).
Note that all the widgets OUTSIDE the black enclosure are GLOBAL controls for that area. All widgets INSIDE the black enclosure are LOCAL, pertaining only to that sequencer stage. All widgets and text in red denote that they need to be set to a default value (either 0 for random processes or 60 for single pitch widgets to begin working with a preset.)
Sample start with sequencer velocity controls. This works with the Master velocity ctrls for sample start to its right (which should all be set to 0 to begin, which means that they denote the beginning of the sample). The term “velocity” has nothing to do with volume here. It is just another convenient way to go from 0 to 1, “0” being at the beginning of the sample and “1” at the end. With this in mind, the master velocity bias control to its right (VelBias) must also be set to 0 in order to enable the individual controls to its left to reflect the true sample start point. Note: the widget abbreviation such as VelBias may not be exactly the same in your screen. If not, try expanding the screen horizontally to capture more of the text. By first setting this master control to a point where you want to start, then you can tweak each individual sequence stage to reflect a different (or same) starting point. This is one of the major features of the Melodic Sculptor. Below the Sample start area are 16 corresponding mute buttons which allow you to mute any stage individually as the sequence progresses. At the bottom below are radio buttons that turn blue indicating the stage you are in at any given moment. These are display only.

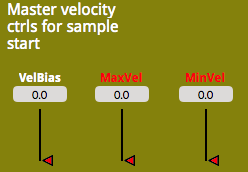
While playing Preset O, slowly move the velocity bias control (white-indicated by VelBias) upward and observe how the sample start point gradually moves from the count of 0 to beyond 6. With this control all up, now move the first sample start widget (Vel00) also slowly upward, noting that the count increases until it reaches 10. This illustrates how the global control and its single stage widget work in tandem. Note also that each of the 16 sequence stages can have the start point individualized.
Preset2: Sample Start with velocity control. Note that pitches are set at 60 and the Transposition is at 0, all denoting actual pitch. Finally, the Single Stage Sample Durations is set to a value of 1 (we will deal with this in detail later). To its right, the On Duration, which is the global sample duration setting, is set to 6.93. Why is that? Because that is the approximate length of the actual sample, namely 6.93 seconds. With the start index/end index widgets spanning 0 – 4, the first 5 stages are activated, each with its own number realized by virtue of the Sample start velocity controls positioned accordingly. Now the fun begins. Move the MaxVel (maximum velocity) control up as the sample plays. Note that there is an increased randomness as the control advances. Now, by moving both red controls, the other one being the MinVel, (with the max always needing to be larger than the min control) find an area somewhere in the middle to achieve a window of randomness of sample starts between 3-6. This only deals with sample start. The end will always be the same in this particular preset). A suggested set of red values would be 0.59 (MaxVel) and 0.47 (MinVel).
Forward/reverse: Reset the preset by selecting it again from the preset menu. Play it again. Find the ReverseSmpl control above. Select “Reverse Sample.” Note that the sample runs backwards according to the original settings. Experiment with different settings of the VelBias widget. With this playing, introduce some randomness by moving the MaxVel upward as you have done above. With this randomness going, move the MaxFr control to 6. You have already seen just the beginnings of the power of combining controls.
Sequencer Stage start-end index controls. An important distinction to note (and applicable also with the durations controls in pink below): With the above, we are dealing with start points within the sample. This means that each of the 16 sequencer stages could have its own individual sample start point. Now, for the material below, we are also dealing with start points (and end points) but this time is is the sequence stage start point (as seen in the StartIndex and EndIndex controls). Unlike the individual stage controls above, this is a holistic control governing all 16 sequence stages with one set of controls (start and end). To being exploration of a sample, I suggest that you designate a start index of 0 and end index of 1 or 2. This will allow you to hone in on the possibilities of the infinite opportunities of changing the sample start for that stage.
Random sequencer start. To its right, the “random” element is a low frequency sine waves as it is in all the “random” processes, initially set at 0.5 (one cycle completed in 1/2 second). The LFOlevel to its right is the amount of strength of that control, or in other words, the amount of randomness. A little goes a long ways here. Still with Preset #2, Set it initially to “0” when you are beginning with the exploration, or else you will not be able to control the stage you are focusing on. Then gradually raise it and hear the randomness increase. How does this random feature differ from the previous MaxVel for random start?
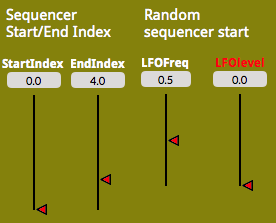
Preset3: (same as Preset 2) Fun with StepSequencer Start/End Index (a “stage” is simply one sequencer step as seen in the advancing blue square): The StartIndex set at 0, and the EndIndex at 4 in this preset gives us 5 stages to work with. As you play it initially, I have arranged the Sample start widgets to reflect this. Move the EndIndex to 2. Note that only the first three stages are sounding. Move the EndIndex to 5 and note the additional stage sounding. Set the StartIndex to 2 and the EndIndex to 4. You then hear only those stages sounding. Move the VelBias control up and note that the whole range of the numbers sounding changes. Reset the preset by clicking on the Preset 3 menu at upper left. To produce a randomness for the sequencer stage start, under the Random sequencer start area, move the red LFOlevel widget up a bit (0.26). Upon playing the sequence, you will notice that the start stage is randomized according to how much you move the control up. Reset the preset again. Now for some randomness in the sample start itself (not the sequence stage start). Under the Master velocity ctrls for sample start move the MaxVel control up slightly and note how each sequence stage’s sample is randomized as to its start point. Move the MaxVel to 0.8 and the MinVel to 0.6, and create another window of randomness with higher numbers than before. You can pause the sequence at any time by clicking the GateSeq box.
You have just experienced two fundamentally different ways of randomizing the sequence progression in time, the first being where the beginning stage order is randomized but each individual stage remains the same. In the second instance, the stage order remains the same, but within that progression, each sample itself is randomized as to its sample start point. Imagine how powerful it can be to combine the two features in a single preset.
Internal sequencer timing. Reset Preset 3. In the same area, play the sequence and move the yellow Rate widget between 1 and 5. Now the actual tempo changes. Reverse: Again reset the preset as above. Play the sequence, select the Reverse Sequence stage and note that the sequence stages that are selected themselves reverse (unlike above where the actual sample material is played backwards). When the Rate is moved up, unexpectedly the tempo between stages is diminished, allowing more of the sample to be heard in the reverse mode.

Sequencer Stage Durations. As the sequence progresses, each stage has its own custom duration which is independent of the speed of the sample playback (again you need to distinguish between the speed of sample playback and the speed of sequence stage progression). The larger the Sequence Stage Duration number of any given stage, the longer the stage will linger at that stage and allow more of the sample to be heard and vice versa. This is independent of the speed of the sample material itself (Single Stage Sample Duration). Or, put another way, it’s sample speed vs sequencer speed.

Preset 3 (again) : Sequence Stage Durations: Playing Preset #3, move the yellow stage duration “D02” up to a value of 10. Note that the sequence now lingers at this stage. Note also that the actual speed of the sample playback does not change. This allows more of the sample to be heard, repeating the numbers 4,5. Nothing else changes. Reset the preset again. Now move the yellow Rate widget up to 5. Note that the sequence stage tempo is increased but the speed of the actual sample remains the same, causing less of each sample to be played at any given stage.
Single Stage Sample Durations. This works in conjunction with the Master Sample Stretch control. Usually the latter is set to equal the actual speed of the sample in seconds when played at original speed and frequency. Then the Single Stage Sequencer Durations, initially set at a value of 1, when altered, multiply the OnDuration of the sample by their value. In other words, once this OnDuration is set (usually to mirror the number of seconds of the sample), each stage has its own multiplier where the sample will play faster or slower depending on whether the control is lower or higher (lower equals faster, etc.). Note that the overall sequencer stage time time allotted to each stage remains the same (as noted above with the Sequence Stage Durations), but within that time window, the sample itself can play faster or slower at any given stage, allowing more or less of the sample to be heard at that stage.

Master Sample Stretch and Sample Duration Modifier. Set the OnDuration to the number of seconds of the sample initially with all single stages at a value of 1. Later on you can move the OnDuration to globally change the durations of all 16 stages at once.

Preset4: Single Stage Sequencer Durations/Master Sample Stretch: Note that here the OnDuration of the Master Sample Stretch is set to 6.93, which means that the original sample length is 6.93 seconds. Play the sequence. Move St1 from a value of 1 to c. 0.45. Note that, although the sequencer stage maintains its tempo, the speed of the sample increases at the stage 1 area just moved. Reset the preset again. This time play the sequence and move the OnDuration widget found below below the Master Sample Stretch heading down to 4. This is a global control and affects all 16 sequence stages proportionally. Note that, while the sequence stage tempo is not affected, the actual samples are sped up, allowing more numbers to be heard from each stage.
The Sample Duration Modifier can best be experienced by setting the sequencer start/end index to one stage (such as zero) as will be seen in Preset 5 below.
Yes, even if only one stage is playing, here is a tremendous amount of creativity available by changing the durations of the sample itself in semi-random ways. The Rate, mdAmpOnDur (modulation amount), and ModShape all have to do with the oscillator that is being used to “randomize” the durations. Initially, the mdAmpOnDur should be set to 0 as in the other random instances, since it in effect activates the randomness. When it is at 0, there is no effect. In the preset I’ve set up note that with each reiteration the relative lengths of all parts of the stage vary. Experiment with changing each of the widgets and note their effect.
Preset5: Sample Duration Modifier. With this preset, the settings will already show what it can do. The single stage is sounding the word “one”. This can be quite effective with a small section of melodic material reiterating at various sample speeds. Move the ModAmpOnDur up slowly and hear the difference as the low frequency oscillator changes the duration via its modulation. Cycle through oscillator wave shapes 2 through 6 and see dramatic changes in the sample as its duration changes in relation to the LFO. If you get no sound, you may need to decrease the value of the ModAmpOnDur. Experiment with changing each of the widgets in turn and note their effect. Other controls:
Morph: This selects which sample will be played in the SumofSines Sound (Analysis 0 or Analysis 1). It doesn’t belong in this area but I had to put it somewhere. There is no actual morphing intended in this tutorial.
Formant: This changes the formant characteristic of the multi wave oscillator used in sculpting the sample duration.
Play time. Now that you have an idea of what each feature can do, experiment on your own with combining features, starting with one of the presets 1 – 5.
PART 2: MUSIC SAMPLE (with Morph widget at a value of 0 selecting the saxophone sample)
When modifying spectrum sounds, particularly in the powerful ways we do here, they may sound unnatural or “electronic.” I view this, not as a problem, but rather as a feature when used appropriately. I shall briefly describe each preset and leave it to the user to experiment beyond.
Preset A. Original sample (provided by my friend and master saxophonist Charlie Toquarz, who may be heard in many of my works). Sample is 4.87 seconds long.
Preset B. Single stage at normal pitch but slowed down.
Preset B1. Creating a pause after this snippet of the sample with EndIndex up to 1 and sequencer S1 (stage1) muted to effect space between iterations.
Preset C. Same with transposition, also Sample Duration Modifier
Preset C1. Same with MaxVel engaged for random sample start.
Preset D. Two more stages added. Play this and turn up MaxVel slightly. Magic!
Preset E. More stages, approaching a haunting melodic idea. Again, turn up MaxVel for more magic. Many controls active here.
Preset F. Preset E with sequence stages reversed (but not the sample material itself).
Preset G. Forward sequence stages, with sample material itself reversed at each stage.
Preset G1. Both sequence stage and sample material reversed. Ugh.
Preset H. Preset D with MaxVel raised producing sample start randomness. VelBias also changed.
Preset I. Preset E with VelBias starting everything at a different place. A little mideastern flavor. Note the StartIndex/EndIndex exploring the middle of the sequencer stages.
Preset J. Preset I with random pitch (MaxFr) changing with each stage.
Preset K. Preset J with the global OnDuration much faster.
Preset L. Preset J with Rate quickened (not to be confused with Rate). This is subtle, since what is quickened is the progression between stages. The sample itself is at the same speed.
Preset M. Sample Duration Modifier adds randomness as the sample itself changes speed as it is sounding from one iteration to the next. Experiment with different LFO waveforms modifying via the ModShape menu, also ditto with the LFO Formant control.
Output Envelope area: (Preset 6) This imposes an overall envelope on the entire Sound. Normally this instrument is set for continuous operation. However, in certain instances, one may want the Sound to come and go at certain intervals. If this is wanted, the Output envelope demo preset has a BPM of 0.5. That means that it will reset and trigger every 2 seconds. But wait, look at the DutyOut widget, which is set to 0.5. This means that when the sequence is operating, it will only be sounding .5 (or 50%) of the time. This cycle is completely independent of everything else going on. This is a good way to use the sequence and have it not sounding all the time and just coming in every so often. The combination of BPMOut and DutyOut does that. Normally, the DutyOut will be set to 1, which allows for 100% of the sequence to sound. Note that this area also has an attack and release area as well as an overall level control, all of which are traditional. Finally, the Level performs a final traditional adjustment of overall level.
Now that all the areas have been explored, the user should experiment with her own spectrum sounds which would usually consist of single line melodic material, jazz improvisations, nature sounds, anything that would lend itself to this treatment, by dragging them from the Sound Browser into the Sample boxes of the SumofSines Sound. (To convert any ordinary .aiff or .wav sample to spectrum, consult Kyma Revealed under the Tools area). Generally, highly reverbed material does not work well here, since the reverb itself introduces so many artifacts. Similarly, avoid larger ensemble samples for the same reason. Samples of 1 minute or longer work well here in Kyma, despite Kyma’s warning about not making spectrum samples of over 30 or so seconds. I have never had a problem with spectrum sample conversion of up to and over 1 minute in length with Kyma.
Finally, I ask you to respect that the saxophone sample is for demo purposes only and not for the user’s creative use. Fortunately I just pulled this sample randomly from my collection, and almost any single instrument or voice excerpt will be just as effective using this system. In fact, amazing results can be had by just recording a sample playing a major scale.
Color coding for VCS widgets:
Green: pitch material
White: (White). sample and sequencer start and end, sequencer timing
Yellow: sequencer stage durations (as opposed to sample durations)
Pink: Sample duration and duration change
Blue: Output stage
Red: Random processes which should be zeroed or set to a default at beginning of a sound construction. This will allow randomness to cease, and samples to play at their recorded rate (nn = 60).