In this tutorial, we explore spectral analysis and resynthesis.
Before beginning this tutorial, please download the Kyma Tutorial Sound file that contains the Sounds discussed below. Completion of Tutorial A and Tutorial B is highly recommended. We will be using a keyboard to control some of the examples, so a MIDI keyboard connected to Kyma is also recommended.
I would welcome feedback on these tutorials to enable me to make them even more clear they they are. I have set up a special email account to handle these communications.
Barton McLean, 2/9/16
Each section refers to a correspondingly-named Sound found in this tutorial’s Sound file.
INTRO: Spectral Analysis incorporates several concepts, all of which make working with sound incredibly more powerful. The categories covered here are as follows:
- Spectral Processing by playing specially – converted spectrum samples derived from conventional samples.
- Live spectral processing of ordinary (.aif, .wav) samples, (could also include live input from the microphone, or indeed any other Sound in Kyma).
- Using spectral analysis to create powerful filters
Open the Sound file Bart’s Kyma Tutorial #D – Spectral Concepts and look at the first example, 1. SumOfSines
#1: SUMOFSINES
[Note: Working with this first example presupposes that you had previously worked through the material on p. 181 – 184 in Kyma X Revealed. Hopefully you can access those files when called for here. If not, the just read as much as you can absorb in the SumOfSines section beginning on p. 181 as suggested below.]
Basically we explore a spectral sample already created from an ordinary .aif sample and made into 128 spectral sine wave instructions which can fluidly manipulate these sine waves in all sorts of ways.
This SumOfSines Sound is a great way to start, since it contains in one packet many of the spectral possibilities. Basically it outputs 128 sine waves, one for each harmonic of the originally analyzed sample, continuously varying in terms of frequency and amplitude. Each sine wave oscillator is controlled by its own amplitude envelope and frequency envelope. These 128 amplitude and frequency envelopes are controlled by a spectrum file (‘hi fu mi you Yasuski h.spc’ in this example).
TASK #1: For example, play the sample directly by hovering the mouse over the sample icon and using shift/control/click. You will get merely a nasty buzz.
At this point, and using the Kyma X Revealed text (hereafter called KXR), review your exploration on p. 181, SumOfSines Parameters. Go as far as you can but not farther than p. 184 Spectrum Editor. Hint: Keep in mind that a hot value like !KeyDown, although used for a specific gating purpose, is, like all hot values, just numbers, and as such, can serve any purpose that requires that particular number. In this case the numbers are 1 and 0.
[So you can use !KeyDown anywhere that you need something to go from 0 to 1 and back, not just in the traditional gating mode.]
Speaking of !KeyDown, you really need to hold that key down for a long time before any sound will be heard. Now, on to p. 181. After you are finished, there will be an Answers tutorial which includes one possible version of all the steps you have taken in KXR.
[There is one caveat, not pertaining to this specific example. !KeyDown becomes -1 for 5 ms at the beginning to allow for voice stealing. If you want it to be a simple 0 or 1, you should use !KeyDown abs (so the -1 becomes a 1).]
The Answers Sound for #1 contains what would be the correct result from p. 184, top left. Play that now and hover your mouse over all the parameter fields to get a sense of how the SumOfSines works.
Now on to Tutorial #2.
#2: SCRUBBING THE TIMEINDEX WITH !KEYNUMBER
This is a keyboard scrub of the last spectral sample. Every keystroke represents a snapshot of where the sound is in the TimeIndex, and freezes the Sound at that point. The lowest key represents the beginning of the Sound (TimeIndex) and the highest key represents the end of the Sound. !KeyTimbre is not covered here.
TASK #1: Play the MIDI keyboard and hear how the Sound progresses in time with each different keystroke. A rapid gliss up the whole keyboard with your thumb will give you more of a sense of what this is about.
[If you don’t have a MIDI keyboard handy, just pull down the Fake Keyboard from the Tools menu. Although it won’t have the whole keyboard range you need, you can at least hear some of the middle parts of the frozen sample.]
The !TimeIndex parameter field expression is a bit convoluted to compensate for the fact that the MIDI keyboard (usually) only will be putting out MIDI note numbers 36 through 96, but the actual MIDI note range is 0 -127 (or 1 – 128). And so, it needs to convert 36 -96 first to equivalent of 0 -127, and then convert that to the !TimeIndex control of -1 to +1.
![]()
Play the Sound. There will be nothing in the VCS (Virtual Control Surface). You need to play the keyboard chromatically from bottom to top to hear the effect, which will be to divide the sample into many discrete steps. Many of the keys will produce nothing but silence, since there is silence also in the sample. This contains no Answers equivalent.
#3: BASIC LOOPING WITH INDEPENDENT FREQUENCY AND DURATION
This is a basic workhorse of spectral processing, namely that you can have independent control of pitch and duration with reasonable quality of sound.
TASK #1: While playing the Sound,move each fader and hear the results. Now look at the parameter field of Frequency 0. This expression takes the default frequency and makes it a multiple where 2 is an octave higher and 0.5 is an octave lower, etc. Similarly, the OnDuration parameter takes the length of the sample, 3.697785d s, and multiplies it by the !GainDur hot value, achieving an independent control of speed. Keep in mind that, as always, you are working with spectral samples, not the ordinary .aif or .wav samples. Since the SumOfSines uses the data in the spectrum sample to power its frequency/amplitude points in real time, covering 128 or 256 sine waves, this independence is assured. There is no Answers equivalent. Go on to #4.
#4: SCRUBBING THE TIMEINDEX
Note that the CtrlTime check box is checked, and the Loop check box is unchecked. When in the Loop mode, the SumOfSines acts much like a supercharged ordinary sample, and plays through the sample according to its OnDuration parameter field. In CtrlTime mode, OnDuration has no effect and one has to provide an additional time- varying control to move the TimeIndex along through the sample. The !TimeIndex parameter field supplies this.
TASK #1: Before we go any further play this tutorial. You will hear nothing unless you move the !TimeIndex widget up and down with your mouse. Experiment with this and note where in the sample you are and what value the TimeIndex is providing at that spot. Note that when you move the fader up, the sample goes forward, and when you move it down, the sample goes backward (this is called “scrubbing”). You can oscillate between them as often as you like, creating interesting variations in the sample. When you stop the fader, the Sound will assume a steady state characteristic which may in itself be an interesting basis for a complex Sound. But that’s for another tutorial. But you should note the values put forth by the !TimeIndex fader. They are always ranging between -1 and + 1. Very important.
TASK #2; SMOOTHING: You will notice that as you move the fader up and down the sample does not proceed smoothly but rather has a sort of glitchy quality, like R2D2. Kyma has a fix for that, and it’s found in the smoothed Capytalk message. And so, your task here is to go to the !TimeIndex parameter field of the SumofSines sample Sound and type the smoothed message after the !TimeIndex hot value (leave one space after !TimeIndex).
![]()
Now move the fader up and down and you will hear a significant difference in that the glitches have disappeared. As always, go to the Kyma help menu and pull down Capytalk reference. Type in “smooth” and you will get a few relevant definitions.
Now go to the Answers for #4.
#5: TIMEINDEX SCRUBBED BY FUNCTIONGENERATOR
INTRO: The interesting thing here is how the FunctionGenerator controls the TimeIndex. We’ve already seen that, without some movement in the TimeIndex, the Sound will just freeze, as in Tutorial #2. Here, the FunctionGenerator provides the movement. It does so by housing the fullRamp waveform and spooling out its data, generating a continuous value of -1 to + 1 to power the TimeIndex, which by definition requires the exact same values (1- to +1) to proceed from beginning to end of the spectrum sample. Look at the FunctionGenerator’s wavetable and note that this waveform is a full ramp wave, which in Kyma means that it, by definition, goes smoothly from – 1 to +1 and then immediately back to – 1. This continuous, smooth upward movement moves the TimeIndex forward from beginning to end of sample. The FunctionGenerator also has a trigger mechanism and an OnDuration, which should be self explanatory (this replaces the OnDuration of the SumofSines, which is inoperative in the CtrlTime mode.). Note also that the AR envelope generator is in its usual role of controlling the level envelope and is triggered also by the !KeyDown.
TASK #1: Play from the keyboard to hear all this.
[For those using the fake keyboard, Symbolic Sound gives this caveat: “When a Fake Keyboard button is held down, the VCS faders do not update. If you open the Oscilloscope, click the >< button several times (until you see something like 2 seconds), then play your Sound, you will see the FunctionGenerator or ADSR outputs work properly when you play a key on the Fake Keyboard.”]
TASK #2: There is another control that has a time-varying component that we can use to control the TimeIndex, namely an ADSR (actually there are several more, but that’s for another day). At this time, your task is to find a way to substitute an ADSR for the FunctionGenerator to control the TimeIndex. To do this, look at the TimeIndex in the SumOfSines and see how the FunctionGenerator is inserted into it.

So, do the same for the ADSR (copy/paste). Keep in mind that, since there are two envelope generators in the Sound, you need to differentiate them as their hot values appear in the VCS. So, instead of !Attack, label it, for example, !AttackADSR, etc. However, the three keyboard MIDI controls do not ever change their names. They are !KeyDown, !KeyVelocity, and !KeyNumber or !KeyPitch.
One further note about the two EnvelopeGenerators; the job of the AR is its traditional role of shaping the level of the Sound and gating it on and off. The job of the ADSR, on the other hand, is to scrub through the spectrum sample according to how its controls are set.
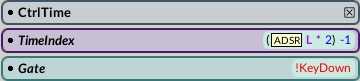
Regarding the SumOfSines parameter field check boxes: Here, TimeIndex is checked and Loop mode is not. Note that, in TimeIndex mode the OnDuration parameter field has no effect.
Play the Sound from the keyboard. As always when you make a change in a Sound, you need to adjust the VCS to reflect the new alignment and values in the widgets. Play special attention to OnDuration, which, when set at less than 1, will play faster, and when set above 1, will play slower. In neither case is the pitch affected, a central property of the spectrum concept.
#5 (ANSWERS, PART1)
Don’t let the SoundToGlobalController scare you. It is just used to set up the display so you can actually see the numbers moving. Just ignore it for purposes of this tutorial and those that follow, and enjoy the show of numbers flying by on your screen produced by it.
Basic operation: The keyboard triggers the Sound level via the AR, and triggers the TimeIndex via the ADSR. Same trigger, different functions. Note that the ADSR is often used to control the level envelope, but since it is a simple TIME-VARYING entity going from 0 to 1 via several segments (after the key release it goes back to 0), it is ideal for controlling the TimeIndex. Try different arrangements of this ADSR in the VCS while playing. I have extended the !AttackADSR, !DecayADSR, and !ReleaseADSR times to 4 seconds in the VCS. I have also added a red widget that displays the progress of the ADSR as it travels through its stages. This is for display only — it can’t be moved in the VCS. OK, now let’s see what happens exactly with several presets I have set up and their effect on the Sample’s TimeIndex, as shown by this display.
Default: Here the attack has 1 second to reach its high point and then it sustains until the key is released, at which time the release has 1 second to go back down. Note that this keyup/release propels the sample backwards. In the red display, up means forwards, down means backwards (this is, after all, scrubbing back and forth within the sample). Note that the decay has the effect here of delaying this settling of the Sound on the sustain part.
Remember that, while the attack, decay, release are TIME controls, the sustain is a LEVEL control. This means that, like all level controls, the sustain’s value only ranges from 0 to 1, unlike the attack, decay, release controls, which can extend out many seconds since they are TIME controls.
Preset 2: (Keep that finger down on the key!) Here the !Sustain is all the way down to 0. This means that, since the !Decay proceeds from the top of the !Attack to the !Sustain level, if the !Sustain is at 0, then the !Decay must also go to 0. So, then what happens to the !Release? Nothing, since there is nowhere further to go. It has already reached its 0 point.
Experiment with different settings of the ADSR and note the backward/forward motion as the widget values go down and up.
Open the ADSR Sound and mouse over the titles of each parameter field to see exactly what each one does, as you have seen and heard in this tutorial.
KEYVELOCITY ON ADSR
In the ADSR Sound, find the Scale parameter field, which is at a value of 1 (remember, Scale values are always 0 to 1). Like most Scale parameters this defines the output level, this time of the ADSR. And remember that, since this ADSR is controlling the scrubbing of the TimeIndex, it has nothing to do with volume. The AR takes care of that.
TASK #1: Substitute !KeyVelocity for the “1” in the Scale parameter field of the ADSR. Now play the keyboard with a very light touch. Then play it with a heavy touch. Notice the effect that !KeyVelocity has on the ADSR’s output level and thus it’s ability to cover a smaller or wider range of the sample.
Perhaps you have noticed that this Sound is still sounding kinda weird — not all of it being present. Why is that? Think of it for a minute, and think about what numerical value the full TimeIndex requires. If you need help, mouse over the TimeIndex parameter field to get the answer.
TASK #2: If you find the total range of control of the TimeIndex inadequate, and I hope you do, how would you use simple math in its parameter field to correct it? For answers, see Part 2.
#5 (ANSWERS, PART 2) TimeIndex scrubbed by ADSR; use of parentheses.
Remember when you controlled the TimeIndex by the FunctionGenerator and it sounded more normal? Before proceeding, go to the Capytalk reference in the Help menu and search fullRamp (case sensitive), which is the waveform the FunctionGenerator has. Note that it has a value from -1 to +1. The FunctionGenerator simply turns this into an envelope output by triggering it and giving it a control shell. Now open (double click) the ADSR in this tutorial and mouse over its name at the top. Note that its values go only from 0 to 1, with nothing negative. So you only have 1/2 of the TimeLine’s values here with the ADSR, meaning that the sample will only sound from its middle to its end. So our task is to convert this 0 to 1 range to -1 to +1 to conform to the need of the TimeIndex. This now (like so much in Capytalk) becomes simple math. Stop for a minute and try to figure out how you’d do it. Stumped? I was too the first time I tried it in the “Revealed” manual.
Solution: First multiply the ADSR by 2, thereby extending its range from 0 to 2. Then simply subtract 1 from the whole expression so far, reducing it from a range of 0 to 2 down to -1 to +1. Notice I said “whole expression.” Here is where the parentheses come in. You need to subtract 1 from the whole expression up to that point. Without the parentheses, you would be subtracting the 1 from the 2, resulting in just a 1, and multiplying the ADSR by the 1, thereby having no effect at all. See the complete expression in this tutorial example.
A student asked why we make the adjustment to a range of -1 to +1 in the TimeIndex parameter field of the SumOfSines sample, rather than in the VCS ADSR widgets. The answer is that there is no TimeIndex widget in the VCS. The only place there is a TimeIndex is in its parameter field in the SumOfSines. So this is where you make the adjustment.
And so you have now restored the complete range of the TimeIndex (-1 to +1) and the Sample (beginning to end). Play the Sound again while experimenting with different keyboard velocities and different ADSR settings. Note again that, the harder you play, the greater the range of the sample. When you extend the !AttackADSR and !ReleaseADSR you slow the Sample down. Remember, the !KeyVelocity is not controlling a volume level, but rather a range-of-sample level. The harder you play the greater the range of this spectral equivalent to the sample. This inevitably affects the speed of that segment also, since the attack, decay, release times are fixed. So if you have a greater range within a fixed time period, the Sample will appear to be moving faster, and vice versa.
#6: TIMEINDEX SCRUBBED BY LFO
Here is the same vocal sample controlled by an ADSR in a similar way to a previous tutorial (except that it is triggered by the “1 bpm: !BPM” expression rather than the !KeyDown).
TASK #1: Play around with the ADSR widgets to hear their effect, similar to that heard before. Then… find the LFO (LowFrequencyOscillator) in the prototypes, copy and paste it in the TimeIndex parameter field, exactly substituting it in replacement of the ADSR. You will then need to play the Sound and go into the LFO to change its frequency to something like”!FreqLFO hz.” You also may need to change its frequency range in the VCS editor to something like 0 – 5.
Note that the keyboard gating has been replaced by a continuous gating so it will be always on.
Go on to the Answers to check your attempt.
#6 (ANSWERS)
Here, all you have to work with are the !FreqLFO and the !Modulation (which is the level of the LFO controlling the range of the sample). But that is plenty. Remember that the LFO (LowFrequencyOscillator) is just another bunch of moving numbers — in this case, unlike audio oscillators, it happens to be moving slowly enough that it can be able to affect the !TimeIndex meaningfully. As most Kyma Sounds, the LFO has a numerical range of from 0 to 1. See how, in the TimeIndex, we were able to use the same basic expression used before to equalize it to cover the whole range ( -1 to +1) of the TimeIndex. The exact same strategy is done here. In order to properly display this movement from -1 to + 1, we had to add another Sound to precede the SoundToGlobalController display vehicle, namely the ScaleAndOffest, a handy device to make all sorts of adjustments. We had to do this because there was no way to make this adjustment to match an expression in a parameter field other than to create the same conditions in another parallel track.
TASK #1: Experiment with the various widgets in the VCS and note how they function together and how they affect the scrubbing activity.
#7: BASIC SPECTRUM PLAY W TIMEINDEX, SPEED, PITCH INDEPENDENCE, !BPM TRIGGERING
Here is a very versatile spectral playback Sound. This needs no keyboard trigger.
TASK #1: Play the Sound and try to determine how each parameter field is influencing the Sound. Try different VCS settings and save a few. Especially explore the relationship between the !BPM and the OnDuration.
TASK #2: Mouse over the Gate parameter field in the SumofSines and note that, when CtrlTime is checked as it is here, the OnDuration field is not active. Why would it not be active?
[Answer: Because the OnDuration field in the FunctionGenerator is the active one.]
#7 (ANSWERS).
What makes this tutorial work?
AR triggers the sound level envelope via the !BPM speed.
The FunctionGenerator, also triggered by the same !BPM, controls the flow in the TimeIndex. One advantage of this over the ADSR is that it has an !OnDuration parameter that governs speed of the sample. The disadvantages are that its segments can not be independently controlled as they can be in the ADSR.
SumOfSines TimeIndex: Note here that, in addition to the FunctionGenerator, it has a hot value added to it. Thus, the start time of the sample can be changed by moving the !Index widget.
Thus ends Tutorial D, Part 1. Now go on to Part 2 (soon to be available), using the same Sound file you have been using for this tutorial.
In the #5 Answers, Part 2, I incorrectly neglected to check a box in the SoundtoGlobalController. As is, it will not play. If you put a check in the “Silent” box of the SoundtoGlobalController, then it will play just fine. You will notice that the box was correctly checked in its companion (5. Answers Part 1).