This is a continuation of Tutorial D, Part 1. In this tutorial, we explore live spectral analysis/resynthesis and spectral modification.
We continue using the same Kyma Tutorial Sound file we used in Tutorial D, Part 1.
Each section refers to a correspondingly-named Sound in this tutorial’s Sound file.
#8: TIMEINDEXFORFILENAME TO PLAY SPECTRAL SAMPLE THROUGH AT ITS ORIGINAL TEMPO.
TASK #1: To find a means to simply play the SumOfSines spectrum file at it normal frequency and tempo. For this Kyma has a special Sound called TimeIndexForFileName which you will find in the Prototypes. Copy it and paste it into the SumOfSines TimeIndex parameter field.
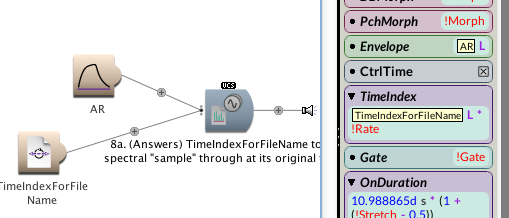
TASK #2: You are not quite done. Look at the Gate parameter fields in all three sub-sounds. Note that they are different. If you want to coordinate the level gate with the TimeIndex gate, you need to go into all three gate fields and just type the exclamation point in the fields, producing the !Gate hot value. Then when you press the !Gate button in the VCS, it will initiate both the amplitude envelope (AR) and the timeindex.
#8A (ANSWERS)
TASK #1: Press the Gate button and the spectrum sample will play at its normal frequency and tempo. Be sure to adjust the loop points or you will get a buzz halfway through the sound. Yes, the loop points work here, even though the CtrlTime is checked, courtesy of the TimeIndexforFileName Sound. The best of both worlds! Also, play with the various VCS widgets to discover the incredible versatility of this Sound.
TASK #2: Looking at the VCS and its backward/forward loop feature, how could you get a steady state sound such as a trombone, and extend it so that it can have an infinite length with no glitches? Answer in 8b.
#8B (ANSWERS)
Here we have a trombone sample with BackandForth checked. This means that once the sound starts, it will loop backwards and forwards infinitely, and if the loop is done correctly, the sound will sustain forever. A great way to get a sustained sound from a short sample.
#9: LIVE SPECTRAL ANALYSIS. BASIC
Here is a way to take ordinary samples and process them in ways somewhat similar to spectrum samples. But here the conversion from audio to digital frequency/amplitude data is immediate. This does take more computing power but results in some unique capabilities. The two key unique components of this Sound are the LiveSpectralAnalysis (LSA) sound and its output into the OscillatorBank. The LSA takes its input and, on the fly, CONVERTS it into a spectrum, which then controls the OscillatorBank.
Once in the spectral domain, many things are possible, but special to this Sound is the way it can manipulate certain harmonics pitchwise to come up with quite different timbres and pitches. It works best with active sounds.
TASK #1: Play the Sound and experiment with the parameters. Note the difference between the two frequency hot values, !LSAInterval and !Interval. The !Interval is a simple hot value controlling sample frequency and as such, the sample speed changes with the pitch. The !LSAInterval, on the other hand, when it changes, has no effect on the speed. And so it would seem that only pitch control is independent. But not so. You can alter the sample !Interval, and change the !LSAInterval by the same amount in the opposite direction, and keep the same pitch but change the speed (check out the presets for this). The sample loop start is also a hot value. Experiment with these now. Note that the !LSAFreqScale parameter has an elaborate expression. That is because it is a scale parameter, and needs to be converted into HZ and then MIDI note numbers. This has no Answer tutorial.
#10: MORE ELABORATE LSA
The big feature here is that I have checked the Harmonic box in the LSA Sound.
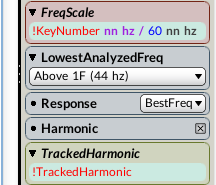
This brings into play several new parameter fields, namely TrackedHarmonic, LowFreq, and HiFreq. These interact together in unforeseen ways to change the harmonic structure of the LSA, producing surprising results.
As always, you can read the parameter help at any time by clicking the disclose triangle next to the class name (LiveSpectralAnalysis) or by hovering the mouse pointer over the name of a parameter (for example, TrackedHarmonic).
TASK#1: Play the Sound and experiment with its controls, using the presets as a guide.
TASK #2: While playing, roll the dice and hear a wide variety of amazing (and some not so amazing) results. Any of these settings can always be saved as presets via the camera button in the top left corner of the VCS.
This has no Answers equivalent. Go on to #11.
#11: RANDOM PITCH, SAMPLE START USING LSA
This adds some features of the sample in the previous tutorial, namely the Sample Start and the Sample Frequency parameter fields. Look at the Frequency parameter field in the LSA (LiveSpectralAnalysis) Sound:
(!Interval + ((((1 bpm: !BPM) nextRandom abs) * (!Max - !Min) + !Min))) nn rounded
The !Interval performs its basic function of transposing the sample in half steps. Then there is a fairly standard random component. What this expression means is that, every !BPM beat (1 bpm: !BPM), a random value is requested (nextRandom) that has a positive value going above zero (because of the abs). This is multiplied by a qualifier ((!Max - !Min) + !Min) which governs the breadth of the pitch change, with increments in half steps. The nn means that the resulting random numbers will be interpreted as MIDI note numbers (where 60 nn corresponds to middle C). Finally, rounded means that all values will be rounded to the nearest whole number integer. If the !Max and !Min hot values are equal, there will be no random pitch change. If !Max is at 6 and !Min at 0, there will be random pitch changes ranging within a tritone range (six half steps).
Start parameter field: Another new feature: every twice the !BPM rate, the sample will start at a different random time point in the sample. The abs again will keep the values positive. The nextRandom normally puts out a value of -1 to +1. The abs changes all negative values to positive ones. At this point go to the Help menu and select Capytalk reference, do a search on nextRandom to see what values it puts out and how it is used. Or, to save time, just hover your mouse over the purple nextRandom message.
TASK #1: Open and play the Sound and its presets, and experiment. This has no Answers equivalent, so go on to #12.
#12. 32-BAND FILTERBANK (CTRL FREQ & AMPS)
A whole different aspect of spectrum control involves various banks (CloudBank, OscillatorBank, VocoderBank, etc.). These are often controlled by arrays of parameters, in this case frequency and amplitude, all of which appear as individual widgets in the VCS and can be manipulated manually. A particularly effective technique is to roll the dice, which moves all the widgets and effects large changes. Mouse over the Sounds and see how they work. This type works best with source samples that are clicky and activate the filters.
TASK #1: Where else in these tutorials have you seen arrays? Are they all alike, or are these particular arrays special just to the FilterBank or spectrum Sounds? Let’s see.
From the StepSequencer 16 Stage (from the Prototypes), let’s pick one of the scripted arrays. This might be familiar from the StepSequencer tutorials. These arrays are all possible to use, but the one that shows the most promise is the one in the KeyPitches parameter field because that has, not only the 16 !Interval widgets producing frequency, but also adds a transposing hot value (!LogFreq) outside the suffix regimen to allow all 16 increments to transpose together. So copy this expression from the StepSequencer …

and paste it into the SyntheticSpectrumfromArray Frequencies parameter field and see what happens. Do this and play the tutorial Sound. As always, clean up the VCS so that the frequencies, now reduced to 16, all line up. Don’t bother with the amps. Be sure to set the !LogFreq apart in the VCS since this will be the transposing widget for all frequencies. While you’re at it, deselect the dice roll on this widget by clicking on its name (the name will turn gray). This is because when you roll the dice, this must not be one of the widgets whose value is affected.
TASK #2: Play the Sound. You should hear a rather low siney single pitch sound. Why is that? Because the VCS, seeing new widgets, always defaults them, in this case all to 0. It appears that these !Interval widgets have a range of -24 to + 24 (4 octaves). So you need to first change the values (select all the frequency widgets and modify them together in the VCS editor. Change their range to 0 – 96 with a grid of 0 (looks like it’s similar to a MIDI keyboard nn range, no?) Now you’ll have the full range of frequencies.
TASK #3: Play the Sound again and this time roll the dice. An amazing chord will sound, articulated by the clicky sample input. But it’s still in the low range, so this time raise the whole range by moving the !LogFreq widget, bringing it into a more pleasant pitch range.
Now you have 16 pitch widgets and 32 amp widgets. So you can go back to the StepSequencer 16 Stage and steal the other relevant expression — this time from the KeyVelocities parameter field. Copy this….

and paste it into Amplitudes parameter of the SyntheticSpectrumfromArray Sound. Play the Sound again. Note that you have another feature, namely the ability to individually select each filter band. Do this as you play, rolling the dice.
Go to #12A (Answers) to check your work.
#12A (ANSWERS)
Try some of the presets and roll the dice to make your own. Notice that the velocity switches may not be satisfactory, since they can not be divorced from the dice rolling, and they also are either on or off and do not have gradations of volume. How can you change these to continuously – varying faders for volume with a traditional value of 0 – 1 and divorce them from the dice rolling?
TASK #1: Do this now in the VCS editor, keeping in mind that it will be very easy and quick if you select and change all of them at once. For the answers, go on to Tutorial 12b (More Answers).
#12B: (MORE ANSWERS)
Notice that by allowing the 16 volume widgets to have continuous values between 0 and 1, you can achieve greater flexibility and variety in the timbres you come up with.
By the way, this Smalltalk code array (with the collect:) is not necessarily tied to a frequency parameter field. it could also be used in other fields, such as the Amp field, perhaps, with a little juggling of the values in the VCS. Keep in mind that an array is an array, and that goes for Smalltalk arrays. It’s just a way of schlepping a lot of similar widgets into a parameter field.
And now a little secret I am going to share with you. Often, when I am working with Kyma, I don’t really understand everything I am doing, especially with Smalltalk scripts. But I don’t have to. All I really need to understand is, not how to CONSTRUCT them, but rather how to USE them. After awhile, one develops a sixth sense about this, albeit with lots of experimenting. Hopefully in some other life the Smalltalk light bulb will go on. But I have not found it necessary, even though I often use it unwittingly (or wittingly).
TASK #1: From the Tools menu, select the Spectral Analysis tool and follow its simple directions to convert your own samples to spectral analysis files to try out in these tutorials and other Library Sounds. Personally, I find the default values extremely useful and rarely need to change them.
Also personally, I have never found it useful to go beyond the area which says “Create Spectrum File” and its consequent folders of spectral Sounds set up to work with the sample you’ve created. Beyond that, where the “Set Quasi-Harmonic Parameters” begins, I have found it to produce diminishing returns in terms of the time spent and results achieved. But probably this is just because I use mostly material with a rich harmonic and noise component and “in the cracks” sound timbres, which do not like to be put through these later stages. But I’m sure this area will be productive if you need fairly simple steady state sounds that have an identifiable pitch [or if you would like to do spectral morphing].
#13A: SPECTRAL MODIFICATION OF PARTIALS
The main spectral engine here is the SpectrumModifier, and that is where you will do all of the experimenting. The SpectrumModifier is a powerful tool for fundamentally modifying the timbral character of a sound in ways that filters can not. This Sound has five basic components here as follows, from left to right:
FunctionGenerator: Here it is used to play a fullRamp wave to last exactly as long as the sample (the portion in mustard color in the Trigger and OnDuration parameter fields). The 1 bpm: provides the trigger and the !Stretch provides the speed.
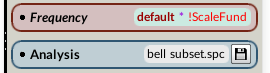
SpectrumInRAMLog: Plays back the spectrum indicated in its Analysis parameter field as amplitude/frequency tracks, which can be independently modified in the SpectrumModifier. This must be the same spectrum sample as that in the FunctionGenerator, as seen in its Analysis parameter field.
SpectrumLogToLinear: The logarithmic frequency spectrum input is converted to linear frequency and then output (you don’t need to be concerned with anything more about this. Just know it’s function). [This Sound is unnecessary if you use a SpectrumInRAM in place of the SpectrumInRAMLog.)
SpectrumModifier: Performs the actual spectral modification.
OscillatorBank: Takes the continuously streaming data from the SpectrumModifier and converts it into a bank of sine waves according to each pair of specified frequency/amplitude points. Outputs these as audio.
Note that, in order for this to work properly, the same sample is indicated, twice in the FunctionGenerator (if done properly it will turn mustard color)….
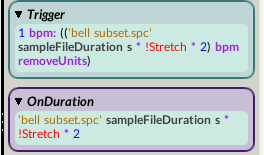
and once in the SpectrumInRAM).
Note also that the first two are bracketed by single quotation marks (and need to be typed or pasted in as text), and the last goes through the traditional sample choice route in the SpectrumInRAM.
At this time it would be good to hover the mouse over all the parameter fields of the Sound components to derive a more complete picture of how all its parts work together.
TASK #1: Play the Sound and experiment with the few controls in the VCS. The FreqScale imparts a fixed frequency as you change the frequency of the !ScaleFund, with each !ScaleFund change imparting an illusion of great timbral change.
TASK #2: Substitute another spectrum analysis for the bell spectrum. For example, try the piano analysis 060 Piano 4 c h.L.spc (just copy this below and paste in the appropriate places in the parameter fields, replacing the bell subset.spc) and paste it in the three places mentioned above, being careful to place it just in between the single quotation marks in the FunctionGenerator. Play the Sound and experiment with the controls as before.
THE LESSON HERE is not to revel in the beauty of this last task, but rather to give you a means to take any spectral combination such as this one and substitute any other spectral analysis. In this case, the same spectrum must be used three times.
#13B: SPECTRAL MODIFICATION OF PARTIALS: USING THE COLLECT: SMALLTALK MESSAGE
This is the same as 13a. You will be changing only one parameter field in the SpectrumModifier, but it’s a doozy. This is the Probability parameter field. Hover over this field and learn what it does.
TASK #1: We have an opportunity to modify each of the 128 frequency/amplitude combinations using the Smalltalk collect: message. Your task is to click in the Probability parameter field of the SpectrumModifier. Once this is active, click on the yellow “i” at the lower right part of the window to bring up a number of possible expressions that might be used in this field. Choose (copy) the one that says:
TrackNumber of: {((0 to: 64) collect: [ :i | !Sw suffix2: i ] )}
and copy/paste it into the SpectrumModifier Probability field.

Then play the Sound and you will see 64 switches in the VCS that can each be turned on and off. Each of these represents a particular frequency/amplitude track.
TASK #2: Roll the dice on these (everything but these 64 switches has been greyed out so as to concentrate on the 64 switches). Notice the amazing timbral variety as the dice rolling randomly selects a combination of frequency/amplitude pairs. When you get one you like, save it as a preset.
This concludes the Spectrum Concepts tutorial. As you have heard, we have just scratched the surface of the power of spectrum.