New to Kyma and eager to get started? Here’s what you need to know to start making amazing sounds right away:
Three Little Words
To start exploring Kyma, all you need are three words:
- Point to what you’d like to hear
- Click to select it
- Space bar to toggle between play and pause (Ctrl+Space to replay from the beginning)
And when you’re feeling really adventurous and curious: Double-click to look inside!
A Map of the Maze
For orientation before you begin your explorations, here’s a map showing some of the windows you’ll see when you first start up Kyma:

- The Prototypes are building blocks — these are the individual modules you’re going to be using to build up new signal flow diagrams or patches.
- The Sound Browser is where you can browse, search, and play Sounds and files in the Kyma Sound Library. You can start your day here by playing the Sons du jour (a fresh selection of sounds created for you each morning).
- The DSP Status shows you audio input and output levels and lets you monitor how much processing time you’re utilizing on each of the processors. It’s also the window where you can select an audio interface and source of MIDI control.
- The Status window lets you know whether the Sound you just played expects any audio inputs or external controllers.
Interacting with Sounds
The first time you play a Sound, you’ll see a window that looks something like this one:
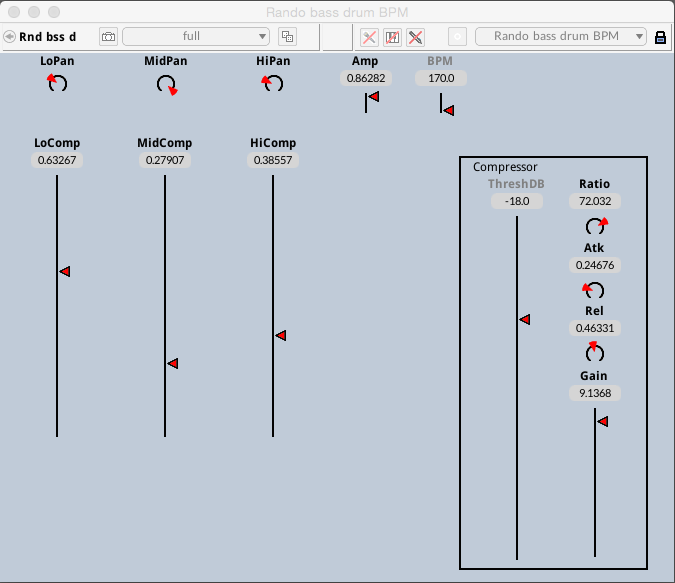
This is a Virtual Control Surface where you can control Sound parameters by clicking and dragging virtual faders on the screen. If you right-click (Ctrl+Click) on a fader, you can remap the fader to an external controller like a MIDI or OSC device.
Signal flow
To look deeper, try a double-click. It’s one of the ways you can open a window for creating and editing signal flow graphs:

- The Sound editor shows you the signal flow on the left and parameters on the right. You can listen anywhere along the signal flow path by pointing at the icon you’d like to hear, clicking to select that icon, and pressing the space bar to play it. To see an individual Sound’s parameters double-click its icon. For suggestions on what to put into a parameter field, click the yellow Information button (the “i” in a yellow circle in the lower right corner). You can open a Sound editor by double-clicking a Sound in the Prototypes, the Sound Browser (where Sound names are shown in blue), in a Sound file window, or even in a Timeline or Multigrid (see below).
- A Sound file window is a collection of Sounds displayed as single icons. To open a Sound file window, double-click on a dark blue, underlined name in the Sound Browser. In the Sound file window, use point, click and space to listen to a Sound. To look deeper, double-click the icon to open the Sound editor and see how the Sound works: the signal flow path and the parameters of each module along the path.
Listening with your Eyes
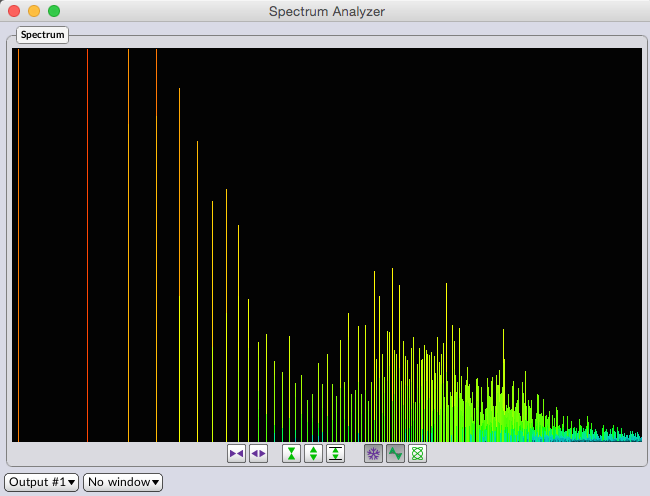
To visualize the audio signal while it’s playing, go to the File menu and select Oscilloscope or Spectrum analyzer. For example, here’s a display of the left channel versus the right channel output:

and a display showing the the changing spectrum of the output:
Source file editors
You’ll also find some windows for editing files before you use them as source material. To edit a file, double-click its name in the Sound Browser. You can also open a file editor by Ctrl+Clicking on the disk icon in the parameter fields of the Sound editor.

- The Wave editor is for editing samples, creating new wavetables, and generating galleries full of inspiring examples based on your sample. Opening one of your own samples and using the Wave editor to generate a Gallery or Grid based on that sample is a great way to learn more about designing your own Sounds in Kyma!
- The TAU editor lets you align two or more files in time and graphically click and drag on the amplitude, frequency or formant envelope independently. It’s a great way to experiment with morphing and cross synthesis between two or more files.
- The Spectrum editor is for editing in the frequency domain. You can select individual partials, draw boxed selections around regions, apply modifiers to the selection and resynthesize the results.
Personal assistants
In the videos and the documentation, you’ll learn how to summon some personal assistants to help guide you along your way:

- The Parameter Assistant provides suggestions and ideas for values you can try in Sound parameter fields
- And the Capytalk Reference provides documentation and examples to show how you can make the Sound parameters depend on each other or automatically change by themselves.
Live performance environments
There are also windows for assembling a live performance environment for yourself, whether you’re performing live to picture in the studio or preparing to take it out on stage:
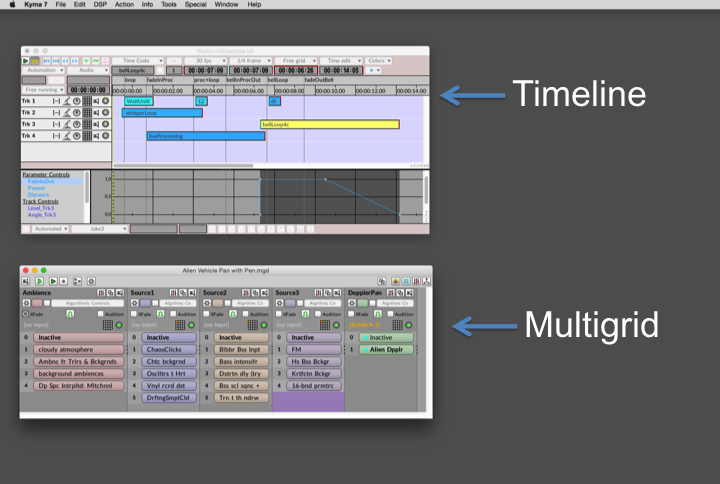
- In the Timeline you can arrange your Sounds in time (sequentially or in overlapping layers) and draw or record the Sounds’ parameter controls.
- In the Multigrid, you arrange your Sounds in parallel tracks or create submixes to route one track through another one. The Multigrid is the ideal place to experiments with infinite combinations of routing and mixing or to perform live in a situation where the timing and ordering of events is determined live and in the moment.
Navigational tools
Wherever you may find yourself while exploring in the multiverse of Kyma, just remember these basic navigational tools:
- To hear sound: Point, Click, and Space (or Ctrl+Space to replay)
- To peek inside: Hover (by placing the cursor over the text or icon or label)
- To open and look deeper: Double-Click
- For more options: Ctrl+Click (or right-click)
A Sound is a Sound
Nearly everything in Kyma is a “sound object” (meaning that you can hear it using Point, Click and Space or open it using Double-click). Depending on the context, a Sound object may look like a line of text, an icon, a signal flow graph, a horizontal bar, or even an editing window.
- Sound Browser: Sounds are displayed by name in blue. Sound files (collections of Sounds) are dark blue and underlined.
- Prototypes: Sounds appear as icons in a horizontal strip across the top of the screen
- Sound file: Sounds appear as icons in a white box and in no particular order
- Sound editor: Sounds appear as icons in a signal flow graph, where the signal flows from left to right
- Timeline: Sounds appear as colored bars with specific durations indicated by the width of the bar (and start times indicate by their left-to-right position in the Timeline).
- Multigrid: Sounds appear as bars colored according to their track assignment. They are not arranged in time order. Instead, they become active when you click on them.
Where to learn more
Tutorials, Help menu, user guide, kyma x revealed, q&a, forum
- Kyma International Sound Symposium
- Eighth Nerve News
- Kyma Vimeo Channel
- Kyma YouTube Channel
- Insights Magazine
- Kyma 7 Tutorials
- Kyma X Tutorials
- Kyma Q&A
- Forums
- Community Sound Library
Advice on learning Kyma
Learning Kyma is a little like learning a new language or mastering a musical instrument. If you spend a little time at it each day, you’ll suddenly find yourself putting together sentences, thinking in Kyma, and eventually even dreaming in Kyma. If you can manage it, even a few minutes every day will yield faster results than spending a few hours on it once a month. And, like speaking a language, it helps to communicate with others who are learning as well as (nearly) native-speakers, so go ahead and access the community site through the Help menu in Kyma and, if you can swing it, a KISS (Kyma International Sound Symposium) is an unforgettable way to connect with the Kyma community in person.

Contrary to what you may have been taught in school, in Kyma, it’s perfectly reasonable to plunge in without fully understanding everything; in fact you’re encouraged to do so! It makes sense to alternate with a more disciplined and systematic approach, but you should also allow yourself time to play. Part of the reason children are so good at learning new things is that they don’t mind tinkering and discovering by doing. You have the advantage in that you know how to learn something systematically, and you can leverage that advantage by also allowing yourself some playful-messing-around time; you may be surprised by some of things you’ll discover through a little nonlinear non-goal-directed playtime.
If you ever feel like you’ve hit a plateau, don’t worry. It doesn’t mean that you’ve stopped learning; it just means that your standards have gotten higher. Once you get past the initial, drinking-from-a- firehose rush of learning, each newfound bit of knowledge may be a little harder-won (but even more thrilling). Pretty soon, you’ll find yourself at a plateau where no one’s ever been before, and everything you figure out is new knowledge that you can contribute to the world of sound design.
One more piece of advice before we get started: you don’t have to undertake this journey alone! Your traveling companions are a mouse-click away. If you run into a wall, don’t get frustrated, just go to the Help menu. Symbolic Sound and your fellow Kyma explorers are standing by, ready to answer questions, or offer suggestions, a friendly ear, or whatever else you might need to help get you under way again!
Kyma X Revealed! (found in the Documents folder in the Kyma 7 folder) guides you through every aspect of the Kyma sound design language. Bursting with step-by-step tutorials, tips, shortcuts, and sound design techniques, the book is written in an entertaining style that makes it fun and informative for the novice and power user alike.
Even if you are new to Kyma, you’ll quickly learn how to process your own voice, morph, cross-synthesize, and granulate sound within the first section. Kyma veterans will be happy to find a wealth of new material documenting recent additions in the latest release. Advanced users will be excited to discover extensive new chapters on programming and scripting in Kyma.
You’ll learn how to use and extend Kyma’s Sound Library, tweak parameters using the Virtual Control Surface, and combine Sounds in the Timeline. Next, you’ll see how to modify and create new Sounds using the graphical signal flow editor, how to control sound parameters with faders, and how to drag-and-drop arithmetic fader expressions from the Expressions Library into your Sound parameter fields. If you’re into coding, you’ll be delighted to find the in-depth chapters on the Smalltalk programming language, Capytalk (the real time parameter event language), and chapters on how to use both for algorithmic sound design and programming custom Tools.