You can use one audio interface as the source of both MIDI and audio, or you can use one interface as a source of MIDI and another as a source of audio.
For example, you may prefer to use a USB audio interface in combination with MIDI sent from your host computer. Or you may prefer to use one of the combination audio-and-MIDI devices to handle both audio and MIDI over USB. Or you may choose to have several USB MIDI controllers on the bus and select between them in Kyma. Or you might use a large audio interface in your studio and a pocket-sized interface when on the road.
DSP Status Window
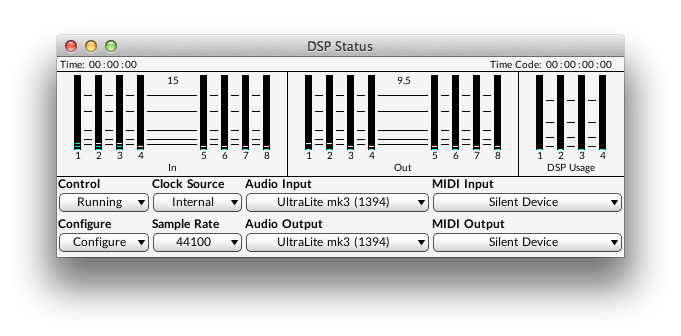 Once you’ve connected an interface to the Pacamara, you can select and configure the interface using Kyma’s DSP Status window.
To open the DSP Status window in Kyma, go to the DSP menu and select Status. You can select and configure your interfaces using the drop-down menus in the lower section of the DSP Status window.
For example, to see a list of all connected audio interfaces, click the drop-down menu labeled Audio Input. You can select a different audio interface by selecting another device from this list. The very first time you start Kyma (or after you’ve reset Kyma’s preferences), the selected device will be Silent Device. You can also select Silent Device when no devices are connected but you still want to play Sounds and look at them on the oscilloscope or edit a Virtual Control Surface. Silent Device is automatically selected when no audio interfaces were detected or when the device you have selected could not be initialized for some reason.
Clock Source and Sample Rate Control
The Clock Source and Sample Rate drop-down menus are used to control the clock source and sample rate of the selected audio interface.
When Kyma’s audio interface is using an external clock source (like S/PDIF or ADAT) from another audio interface, please use the following procedure to change sample rates:
- In Kyma, select Internal as the clock source
- In Kyma, select the new sample rate
- On the other interface, select the new sample rate
- Wait for the other interface to indicate that it has a stable sample rate clock
- In Kyma, restore the clock source to its original external clock source setting
Input and Output Channel Routing
To route the virtual inputs or outputs of Kyma to or from the physical inputs and outputs of your audio interface, use the Configure drop-down menu.

Select Route inputs from the Configure drop-down menu to associate each physical input on your audio interface to any number of Kyma virtual inputs. The example at the left shows how to route the digital S/PDIF inputs of a MOTU Ultralite to Kyma’s audio inputs 3 and 4.

To send each of Kyma’s virtual output channels to any number of physical output channels on your audio interface, select Route outputs from the Configure drop-down menu. The example at the right shows how to route Kyma’s audio output 1 to a MOTU Ultralite’s analog output 1, analog output 5, main left output, headphone left output, and left S/PDIF output.